Product Types
The "Product Types" section of the Ecommerce "Setup" allows you to create and manage customized product types that make for a standardized and efficient classification system for the products carried by your online store.
Creating New Product Types:
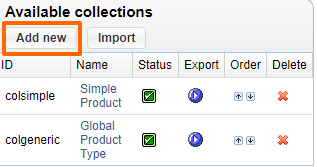
In order to add a new product type, which will be available to use for classifying products when creating or modifying them, simply click on the "Add New" link.
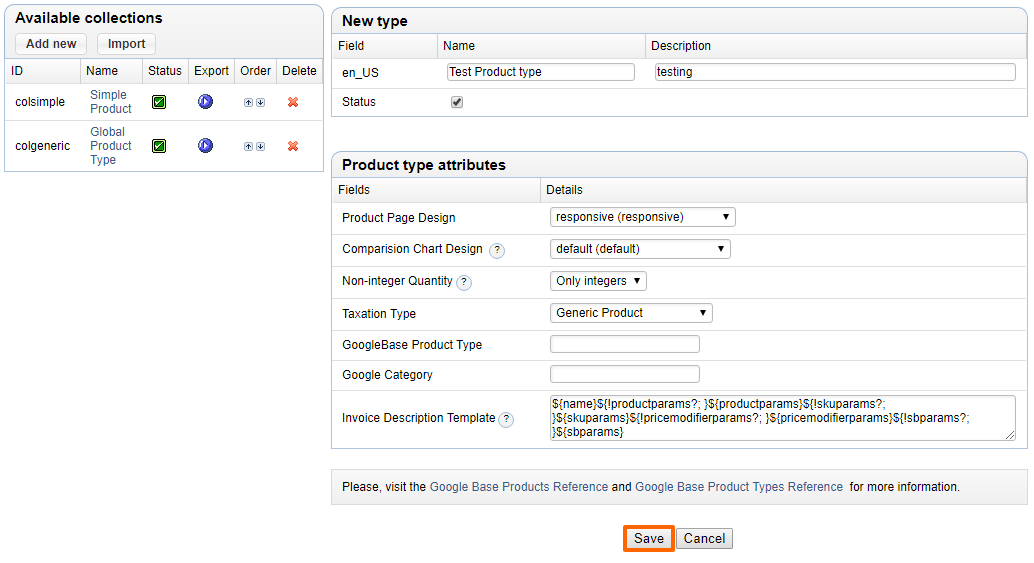
You will then be presented with a window in which you can enter an original name and description for the products type, as well as check the box labeled "Status" if you would like the product type to become available in classifying products right away.
In the lower table of the window, labeled "Product Type Attributes," you will have the opportunity to specify some further details.
First, you can select a design template from the drop-down menu labeled "Product Compare Design ID," which will be used in displaying the product type on your website.
Then, you can specify how products within this category should be taxed, by selecting an option from the "Taxation Type" drop-down menu that accurately describes the type of goods represented by this product type.
Finally, you can enter the GoogleBase department and product type that you would like products of this type to be stored under so that they can be found as easily as possible by people browsing the internet.
Once you are done setting the product type's details, click "Save" and the product type will be added to the "Available Collections" table.
Modifying Product Types:
Should you wish to modify a product type at any point, simply click on its name within the "Available Collections" table.
You will then be presented with a window like the one pictured below, in which you can click on the "Edit" icon for the section containing the details that you would like to modify.
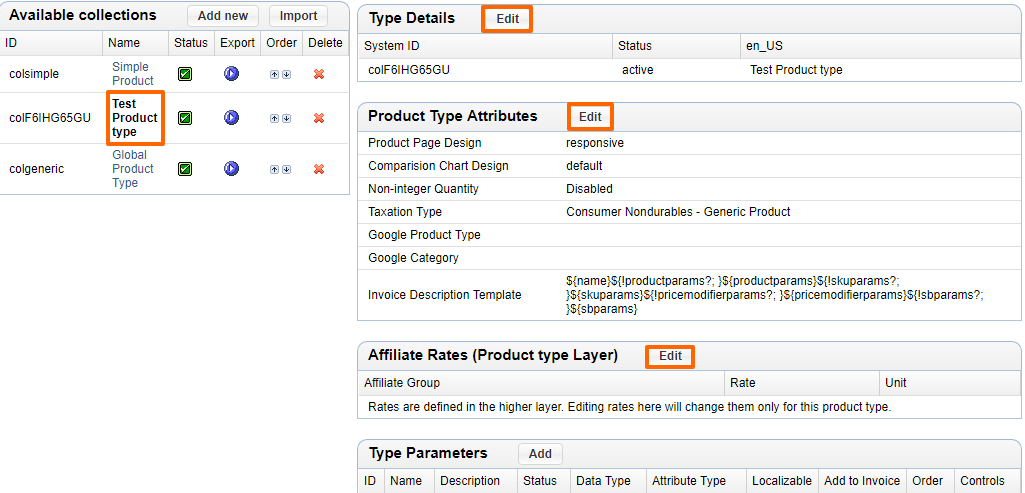
The difference between this window and the window used in creating the product types is the two additional tables: "Affiliate Rates (Product Type Layer)" and "Type Parameters".
Affiliate Rates:
In the "Affiliate Rates" table, you can set specific affiliate rates for products within this category (this will only affect the current product type - the overall global affiliate rates will stay the same).
Simply click on the "Edit" icon within the table, and, in the window that appears, enter the desired discount rates in terms of a certain number of dollars or a certain percentage of the price.
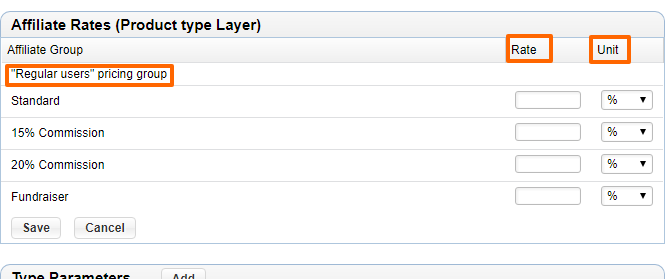
Should you ever wish to get rid of these rates and revert back to the global affiliate rates, simply click on the "Use Global Rates" icon that will have appeared once you set the product type affiliate rates.

Type Parameters:
In the "Type Parameters" table, you can specify which fields you would like to appear when creating and/or ordering products of this type.
In order to create a new field, simply click on the "Add" icon in the upper right-hand corner of the table.

In the window that appears, you can enter an original name for the field, select the type of field you would like to create (check-box, list, text box, etc.), specify whether or not you would like the field to start appearing right away (by checking the "Status" box), choose whether or not to make it a required field (by checking the "Required" box), enter a priority for the field, as well as manually set the height and width of the field.
After completing these details, you can specify whether the field represents an attribute that is the same for all items made of a particular product (by selecting "Product Attribute") or one that can differ between SKU's of the same product (by selecting "SKU Attribute"). All of these attirbute options will work provided the design supports the attribute. If you don't see the attribute working well on your product page, then contact support to get the attributed added to your design.

You can set a field as "Localizable" if you have or intend to have a multilingual site.
You can also specify whether the field is one for customers to complete when ordering the product or one for you (the seller) to fill out when creating products. Note that this setting must be supported in the design. Contact support if you need help adding this to your design.
Lastly, you can enter a GoogleBase attribute name based on what product attribute the field is used to describe, in order to maximize the exposure of your products in online searches.
Once you are done specifying the field's details, click "Save" and it will be added to the list of "Type Parameters."
If you would like to change the order of the fields within the "Type Parameters" table, you can use the the small arrow icons in the "Order" column to move individual fields up or down within the list.
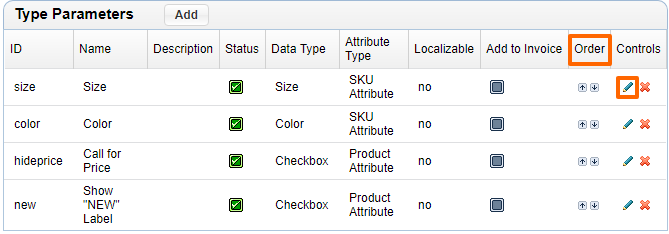
At any point, should you wish to modify a field, simply click on the "Edit" icon located in that field's row of the "Type Parameters" table and alter the settings as desired.
Should you choose to get rid of a field entirely, just click on the "Remove" icon in that field's row of the table, and it will be removed from the list of "Type Parameters."
Designs:
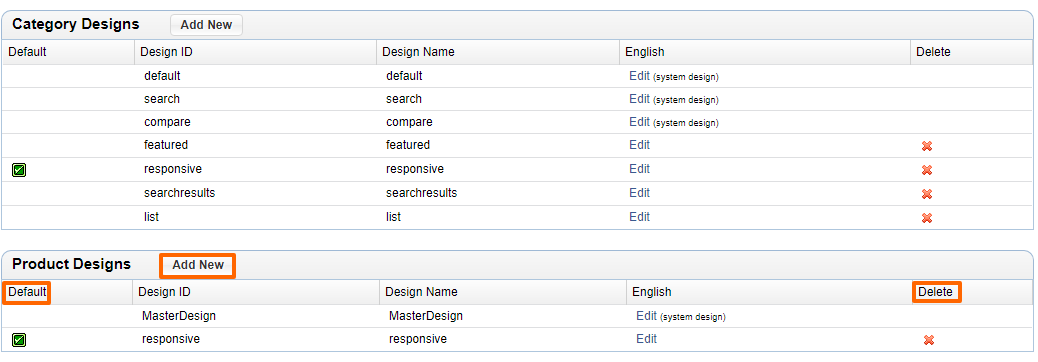
In order to add a new design template to be used in the display of this product type, add a new design via Ecommerce > Setup > Designs & Styles > Product Designs.
You can then enter the ID for the design template you would like to attach to the product type, as well as specify whether you would like for it to be the default design used for this product type on your website (by checking the box labeled "Default").
Should you wish to remove a design template entirely, this can be done here as well, with a simple click of the "Remove" icon located in the desired design's row of the table.
Please send us suggestions regarding this documentation page
If you would like to recommend improvements to this page, please leave a suggestion for the documentation team.
