Pricing Groups
You may specify special pricing for certain users on your site. This requires changes to Ecommerce and CRM. See the details on how to go about doing this.
Create New Pricing Groups
Create the additional pricing groups via Ecommerce > Setup > Pricing Groups - do not mark the new pricing group as default unless you want to change the current pricing for all users to this group. In most cases, you will want to leave default option unchecked.

Set Prices on Your Products
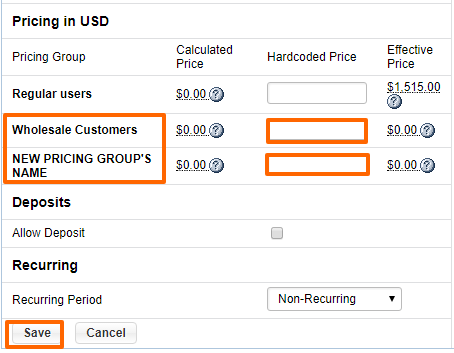
Option 1: Set prices for the additional pricing groups on the SKUs tab of your product.
Double click the skud id or sku number to edit the sku price.

Add the prices to the new pricing group(s) and hit Save.

Option 2: You can also export your products and add the prices for the new pricing group(s) before importing the file again. See here on how to export / import products. The new pricing group's id will be in the column name of the file you export, so you can go back to the Pricing Groups section to verify which pricing group id refers to which.
Option 3: Alternatively, you can add a new formula based on which the system can calcuate the price for the new pricing groups. See the Pricing Models section and edit the settings there. If you need assistance, contact support with details of what you're looking to do and with a link to your website.
Assign Users to The New Pricing Group
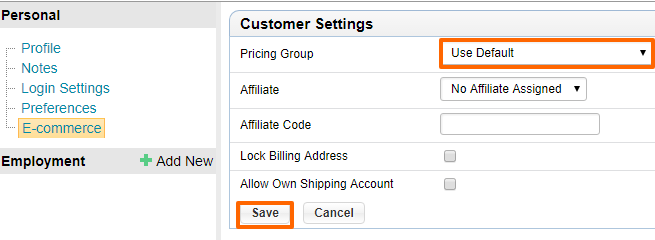
Assign the users to their given pricing groups via CRM > Logins > Double click user > Ecommerce > Edit customer settings

Assign the Pricing Group and hit Save:

You should see your selected pricing group after hitting Save:

TEST:
The user should see their individual price for a given product after they login to the site.
As always, please test out the feature using your own account on the website to be sure that the website is showing the correct prices based on the pricing group assigned.
Please send us suggestions regarding this documentation page
If you would like to recommend improvements to this page, please leave a suggestion for the documentation team.
