Web to Lead Integration
You can connect the forms on your website to Salesforce to allow for better lead management.
For any field on a form, make sure you’ve decided which field it will correspond to in Salesforce. For example, if you have a field called “Project Details” on your contact form, perhaps you’ll have it mapped to the native Salesforce “Description” field, or perhaps you’ll create a custom field called “Project Details.”
Fields can also be set up to map to Salesforce behind the scenes. One of the normal hidden fields sent is ‘Lead Source.’ Make sure to decide what you would like the ‘Lead Source’ for each of your forms to be, and add these to the field’s picklist values in Salesforce.
Once you've created a form in Salesforce, there are 2 ways to integrate the corresponding form on your website with Salesforce.
Option 1: Through an HTML file
Step 1: Rename file.
After you create a web-to-lead form in Salesforce and hit the "Generate" button there, you will receive a .txt file. Please rename the file extension from ".txt" to ".html" and save it on your desktop (or somewhere you can find the file easily).

Step 2: Upload file and test
Upload the file you downloaded from Salesforce to the File Manager module.

Verify that the file is correct by going to the file. In the above screenshot, the url will be something like this: http://www.mydomain.com/data/File/contact-sf.html
You should see a very basic form on the page with no styling. Something like the below. Fill in the details and hit Submit Query.

Look for this lead in your Salesforce account. If it makes it there, then you can proceed to Step 3. If not, please check with Salesforce on what you may be missing.
Step 3: Add integration method to form
Go to the Forms module and either double-click or click the Edit option for the form.

Go to Setup > Integration > Click "Enable Integration Methods" and choose the "Resubmitter" option. In the screenshot below there is already a CRM integration method under the Integration methods that can be left as is.

Step 4: Setup of Resubmitter
Double-click the Resubmitter option or click the Edit button for this option.

A new popup window will appear where you can choose to "Add New Resubmission".
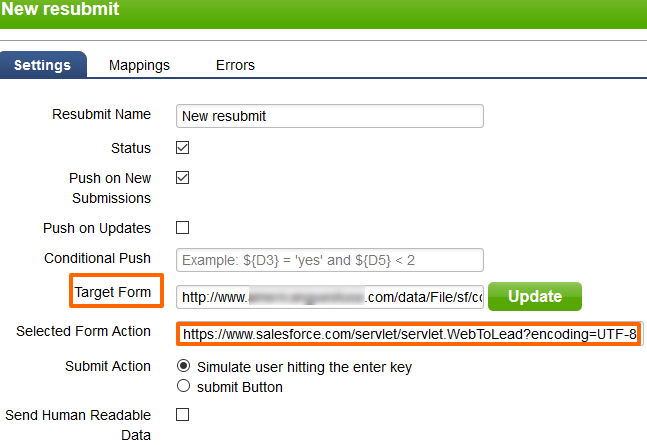
You can leave the default options unchanged, unless you are are sure of what you are doing.
In the target form add the path to the file along with your domain name. Example: http://www.mydomain.com/data/file/yourwebtoleadfile.html
Hit Update.
A new field called "Selected Form Action" will show.
Click the empty text area to see the option to choose a salesforce url. Please select that. This will prompt another field called "Submit Action" to show with the "Simulate user hitting the enter key" option checked.
Hit Save.
Step 5: Mapping
Switch to the "Mappings" tab to see the fields of your form in the left and the corresponding target fields in the right.
Drag the left hand fields to the right and place them as needed.
Hit Save.

Step 6: Test
Go to the form on your site, fill it out and submit it. Check your Salesforce account to make sure the lead has landed there.
Option 2: Add the html code to a CMS page
Step 1: Rename file.
After you create a web-to-lead form in Salesforce and hit the "Generate" button there, you will receive a .txt file. Please rename the file extension from ".txt" to ".html" and save it on your desktop (or somewhere you can find the file easily).
Step 2: Add html to CMS and test
Go to the CMS module.
Create a new page whose URL makes sense to you, perhaps something like /webtoleadforcontactus.
Copy and paste the HTML code from the file you downloaded from Salesforce to the Source editor
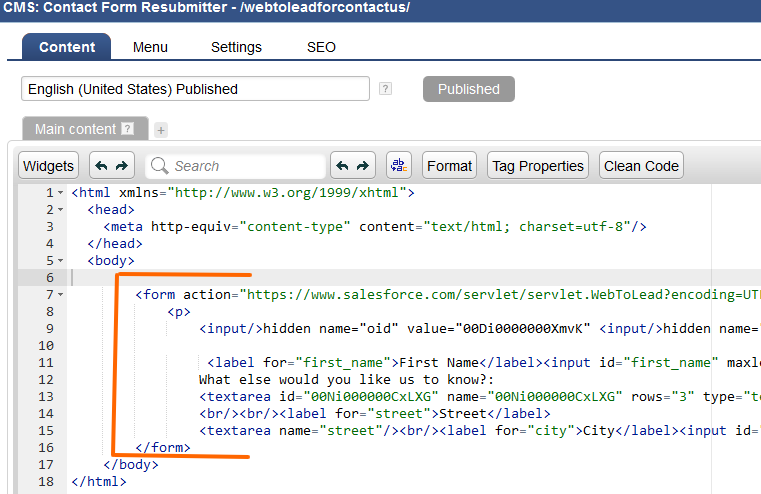
Verify that the form is working well by going to the file. In the above screenshot, the url will be this: http://www.mydomain.com/webtoleadforcontactus
You should see a very basic form on the page with no styling. Something like the below. Fill in the details and hit Submit Query.
Look for this lead in your Salesforce account. If it makes it there, then you can proceed to Step 3. If not, please check with Salesforce on what you may be missing.
Step 3: Add integration method to form
Go to the Forms module and either double-click or click the Edit option for the form.
Go to Setup > Integration > Click "Enable Integration Methods" and choose the "Resubmitter" option. In the screenshot below there is already a CRM integration method under the Integration methods that can be left as is.
Step 4: Setup of Resubmitter
Double-click the Resubmitter option or click the Edit button for this option.
A new popup window will appear where you can choose to "Add New Resubmission".
You can leave the default options unchanged, unless you are are sure of what you are doing.
In the target form add the path to the file along with your domain name. Example: http://www.mydomain.com/data/file/yourwebtoleadfile.html
Hit Update.
A new field called "Selected Form Action" will show.
Click the empty text area to see the option to choose a salesforce url. Please select that. This will prompt another field called "Submit Action" to show with the "Simulate user hitting the enter key" option checked.
Hit Save.
Step 5: Mapping
Switch to the "Mappings" tab to see the fields of your form in the left and the corresponding target fields in the right.
Drag the left hand fields to the right and place them as needed.
Hit Save.
Step 6: Test
Go to the form on your site, fill it out and submit it. Check your Salesforce account to make sure the lead has landed there.
Please send us suggestions regarding this documentation page
If you would like to recommend improvements to this page, please leave a suggestion for the documentation team.